sftp 로그 설정


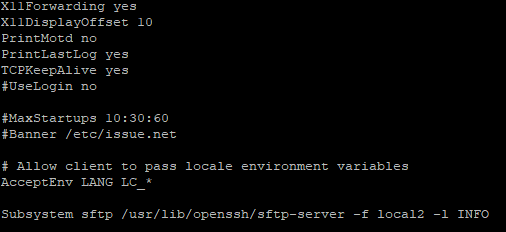
1. /etc/ssh/sshd_config 설정

sftp 서브시스템이 설정이 되어있지않다면 해당 부분의 주석을 제거 또는 추가

Subsystem sftp /usr/lib/openssh/sftp-server -f local2 -l INFO

* sftp-server의 위치는 환경에 따라 다를수있다

    /usr/lib/ssh/sftp-server

    /usr/libexec/sftp-server

    /usr/lib/openssh/sftp-server

    /usr/libexec/openssh/sftp-server

sshd_config


sftp-server 의 옵션이 궁금하다면 

man sftp-server 로 확인해보자

#man sftp-server
더보기


     -p whitelisted_requests
             Specify a comma-separated list of SFTP protocol requests that are permitted by the server.  All
             request types that are not on the whitelist will be logged and replied to with a failure message.

             Care must be taken when using this feature to ensure that requests made implicitly by SFTP clients
             are permitted.

     -Q protocol_feature
             Query protocol features supported by sftp-server.  At present the only feature that may be queried
             is “requests”, which may be used for black or whitelisting (flags -P and -p respectively).

     -R      Places this instance of sftp-server into a read-only mode.  Attempts to open files for writing, as
             well as other operations that change the state of the filesystem, will be denied.

     -u umask
             Sets an explicit umask(2) to be applied to newly-created files and directories, instead of the
             user's default mask.

     On some systems, sftp-server must be able to access /dev/log for logging to work, and use of sftp-server in
     a chroot configuration therefore requires that syslogd(8) establish a logging socket inside the chroot
     directory.

SEE ALSO
     sftp(1), ssh(1), sshd_config(5), sshd(8)

     T. Ylonen and S. Lehtinen, SSH File Transfer Protocol, draft-ietf-secsh-filexfer-02.txt, October 2001, work
     in progress material.

HISTORY
     sftp-server first appeared in OpenBSD 2.8.

AUTHORS
     Markus Friedl <markus@openbsd.org>


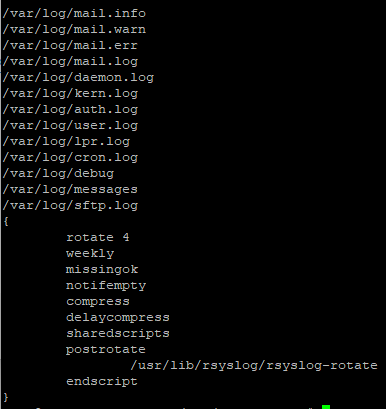
2. /etc/syslog.conf 설정

* 환경에따라 /etc/rsyslog.conf 


아래 내용 추가

sshd_config 에서 설정한 로그 퍼실리티 local2 와 동일하게 설정

#sftp log
local2.*	/var/log/sftp.log

rsyslog.conf


3. /etc/logrotate.d/syslog 설정

* 환경에따라 /etc/logrotate.d/rsyslog 

로그 로테이션에 로그 경로를 추가

/var/log/sftp.log


rsyslog


4.  ssh ,syslog 데몬 재실행

#systemctl restart sshd
#systemctl restart rsyslog
#service sshd restart
#service rsyslog restart
or
#service syslog restart

서버 환경에따라서 ssh, syslog 를 재시작한다


* ssh, syslog 둘중하나만 systemd, ini.d 따로 관리되어 아래와같이 해야 할 수도 있음

#systemctl restart sshd
#service rsyslog restart


출처

https://zetawiki.com/wiki/%EB%A6%AC%EB%88%85%EC%8A%A4_SFTP_%EC%84%9C%EB%B2%84_%EC%82%AC%EC%9A%A9

https://m.blog.naver.com/PostView.naver?isHttpsRedirect=true&blogId=haengro&logNo=220959529675

https://www.serverguide.co.kr/106

git bash 실행

git for windows 사용시


ssh 키 생성


ssh-keygen -t rsa -C “email@example.com”


저장 경로설정

저장경로를 입력하지 않으면 기본 경로에 저장


비밀번호 설정

비밀번호를 입력하지않으면 키 사용시 비밀번호없이 사용가능


키 생성 완료

id_rsa - private key 외부 노출 금지

id_rsa_pub - public key


키등록

ssh-agent 실행


eval `ssh-agent -s`

키 추가

ssh-add ~/.ssh/id_rsa (키 저장 경로)


저장소 ssh 설정


사용하는 저장소의  ssh 설정에 위에서 만든 public key 값을 추가

github
gitlab


Git Clone


저장소의 ssh 주소를 이용하여 clone


git clone git@github.com:user/project.git


yes 입력, 키생성시 비밀번호를 설정했다면 비밀번호 입력

만약 저장소의 ssh 포트가 22번이 아닐경우

ssh:// , 포트 번호를 추가

git clone ssh://git@github.com:[port]/user/project


github


gitlab


소스 트리 ssh 설정


도구 -> 옵션 -> SSH 클라이언트 OpenSSH 선택


참고

git-scm.com/book/ko/v2/Git-%EC%84%9C%EB%B2%84-SSH-%EA%B3%B5%EA%B0%9C%ED%82%A4-%EB%A7%8C%EB%93%A4%EA%B8%B0


Git - SSH 공개키 만들기

많은 Git 서버들은 SSH 공개키로 인증한다. 공개키를 사용하려면 일단 공개키를 만들어야 한다. 공개키를 만드는 방법은 모든 운영체제가 비슷하다. 먼저 키가 있는지부터 확인하자. 사용자의 SSH

git-scm.com

m.blog.naver.com/semidex37/220951282334


[GitLab] SSH Key 등록 후, Source Clone 받기

* 계정이 없으신 경우에는 등록 후 사용하시기바랍니다.* 프로젝트 권한을 계정 생성 후 말씀해주시면 권한...

blog.naver.com


2022.02.09 추가

Unity 2020.1 이후 UnityLoader.js 에서 mobile warning 관련 코드가 사라지고

index.html 부분에서 처리하고 있어 해당부분을 삭제하는것으로 간단하게 해결된다.


2020.1 미만 버전에서만 대응 된 코드

아래 파일을

Assets/Editor/RemoveMobileSupportWarningWebBuild.cs  위치시킨다 

아래 출처 참고

RemoveMobileSupportWarningWebBuild.cs
0.00MB

출처

https://gist.github.com/JohannesDeml/f551b1e60c59e8472c3e843014d7bd10

// --------------------------------------------------------------------------------------------------------------------
// <copyright file="RemoveMobileSupportWarningWebBuild.cs">
//   Copyright (c) 2021 Johannes Deml. All rights reserved.
// </copyright>
// <author>
//   Johannes Deml
//   public@deml.io
// </author>
// --------------------------------------------------------------------------------------------------------------------

#if !UNITY_2020_1_OR_NEWER //Not needed anymore in 2020 and above
using System.IO;
using UnityEditor;
using UnityEditor.Callbacks;
using UnityEngine;

namespace Supyrb
{
	/// <summary>
	/// removes a warning popup for mobile builds, that this platform might not be supported:
	/// "Please note that Unity WebGL is not currently supported on mobiles. Press OK if you wish to continue anyway."
	/// </summary>
	public class RemoveMobileSupportWarningWebBuild
	{
		[PostProcessBuild]
		public static void OnPostProcessBuild(BuildTarget target, string targetPath)
		{
			if (target != BuildTarget.WebGL)
			{
				return;
			}

			var buildFolderPath = Path.Combine(targetPath, "Build");
			var info = new DirectoryInfo(buildFolderPath);
			var files = info.GetFiles("*.js");
			for (int i = 0; i < files.Length; i++)
			{
				var file = files[i];
				var filePath = file.FullName;
				var text = File.ReadAllText(filePath);
				text = text.Replace("UnityLoader.SystemInfo.mobile", "false");

				Debug.Log("Removing mobile warning from " + filePath);
				File.WriteAllText(filePath, text);
			}
		}
	}
}
#endif


-- 기존 내용 --

유니티 webGL 빌드 후 모바일 디바이스로 접속시 아래와 같은 경고창을 볼 수 있다

Please note that Unity WebGL is not currently supported on mobiles.


Build/UnityLoader.js 를 안쪽에 모바일 디바이스 체크 부분을 수정해 주면 제거가 가능하다

빌드 때 마다 수동으로 수정을 하기는 힘드니 PostProcessBuild 콜백을 사용하여 빌드 후 해당 부분을 수정하도록 할 수있다.


아래 스크립트를 Assets > Editor 폴더에 넣어주면 간단하게 사용 가능하다

using System.IO;
using UnityEditor;
using UnityEditor.Callbacks;

public class PostBuildAction
{
    [PostProcessBuild]
    public static void OnPostProcessBuild(BuildTarget target, string targetPath)
    {
        var path = Path.Combine(targetPath, "Build/UnityLoader.js");
        var text = File.ReadAllText(path);
        text = text.Replace("UnityLoader.SystemInfo.mobile", "false");
        File.WriteAllText(path, text);
    }
}

참조 :

docs.unity3d.com/kr/2018.4/Manual/webgl-browsercompatibility.html

answers.unity.com/questions/1339261/unity-webgl-disable-mobile-warning.html

// Upgrade NOTE: replaced 'mul(UNITY_MATRIX_MVP,*)' with 'UnityObjectToClipPos(*)'

Shader "Custom/FlatTransparent" {
	Properties{
		_Color("Main Color", Color) = (1,1,1,1)
		_MainTex("Base (RGB) Trans (A)", 2D) = "white" {}
	}

		SubShader{
			Tags{ "Queue" = "Transparent" "IgnoreProjector" = "False" "RenderType" = "Transparent" }

			/////////////////////////////////////////////////////////
			/// First Pass
			/////////////////////////////////////////////////////////

			Pass {
		// Only render alpha channel
		ColorMask A
		Blend SrcAlpha OneMinusSrcAlpha

		CGPROGRAM
		#pragma vertex vert
		#pragma fragment frag

		fixed4 _Color;

		float4 vert(float4 vertex : POSITION) : SV_POSITION {
			return UnityObjectToClipPos(vertex);
		}

		fixed4 frag() : SV_Target {
			return _Color;
		}

		ENDCG
	}

		/////////////////////////////////////////////////////////
		/// Second Pass
		/////////////////////////////////////////////////////////

		Pass {
			// Now render color channel
			ColorMask RGB
			Blend SrcAlpha OneMinusSrcAlpha

			CGPROGRAM
			#pragma vertex vert
			#pragma fragment frag

			sampler2D _MainTex;
			fixed4 _Color;

			struct appdata {
				float4 vertex : POSITION;
				float2 uv : TEXCOORD0;
			};

			struct v2f {
				float2 uv : TEXCOORD0;
				float4 vertex : SV_POSITION;
			};

			v2f vert(appdata v) {
				v2f o;
				o.vertex = UnityObjectToClipPos(v.vertex);
				o.uv = v.uv;
				return o;
			}

			fixed4 frag(v2f i) : SV_Target{
				fixed4 col = _Color * tex2D(_MainTex, i.uv);
				return col;
			}
			ENDCG
		}
	}

		Fallback "Diffuse"
}


출처: answers.unity.com/questions/290333/transparent-solid-color-shader.html

안드로이드 스튜디오 34.1 기준으로 작성 

BommonVaigationView 생성

프로젝트 생성시

프로젝트 생성시 Bottom Navigation Activity 를 선택

Activity 추가시

New > Activity > Bottom Navigation Activity 선택


...더보기

기존 액티비티에 추가 할 때

containers > BottomNavigationView 를 끌어다넣는다 그러면 라이브러리가 필요하다고 나오는데 OK를 눌러주자 
Menu item을 슥슥 추가하고 id , icon을 적절하게 넣어준다
추가한 메뉴를 추가해준


MissingConstraints 에러가 나고있던것은 레이아웃에서 적절히 잡아주고 background 를 넣어주면 메뉴가 나타난다 
public class MainActivity extends AppCompatActivity {

    private BottomNavigationView.OnNavigationItemSelectedListener mOnNavigationItemSelectedListener = new BottomNavigationView.OnNavigationItemSelectedListener() {
        @Override
        public boolean onNavigationItemSelected(@NonNull MenuItem menuItem) {
            switch (menuItem.getItemId()) {
                case R.id.item1:
                    return true;
                case R.id.item2:
                    return true;
                case R.id.item3:
                    return true;
            }
            return false;
        }
    };


    @Override
    protected void onCreate(Bundle savedInstanceState) {
        super.onCreate(savedInstanceState);
        setContentView(R.layout.activity_main);

        BottomNavigationView navView = findViewById(R.id.nav_view);
        navView.setOnNavigationItemSelectedListener(mOnNavigationItemSelectedListener);
    }
}

activity에서 이벤트 리스너를 추가해준다.


Fragment 생성 

New > Fragment > Fragment (Blank) 로 Fragment 를 생성 
간단한 fragment 를 만듬으로 include fragment factory method와 include interface callback 체크를 풀어준다 


각 fragment 레이아웃을 알아볼수있게 적당히 배경색을 바꾼다 


BottomNavigation 이벤트를 통해 Fragment 변경

처음만든 레이아웃에 프래그먼트출력을위해 컨테이너를 만들자 예시를 위해 fragment_container를 대충 넣었지만 저런짓은 하지말자 

public class MainActivity extends AppCompatActivity {
    Fragment menu1Fragment;
    Fragment menu2Fragment;
    Fragment menu3Fragment;

    private BottomNavigationView.OnNavigationItemSelectedListener mOnNavigationItemSelectedListener
            = new BottomNavigationView.OnNavigationItemSelectedListener() {

        @Override
        public boolean onNavigationItemSelected(@NonNull MenuItem item) {
            switch (item.getItemId()) {
                case R.id.navigation_home:
                    getSupportFragmentManager().beginTransaction().replace(R.id.fragment_container,menu1Fragment).commit();
                    return true;
                case R.id.navigation_dashboard:
                    getSupportFragmentManager().beginTransaction().replace(R.id.fragment_container,menu2Fragment).commit();
                    return true;
                case R.id.navigation_notifications:
                    getSupportFragmentManager().beginTransaction().replace(R.id.fragment_container,menu3Fragment).commit();
                    return true;
            }
            return false;
        }
    };

    @Override
    protected void onCreate(Bundle savedInstanceState) {
        super.onCreate(savedInstanceState);
        setContentView(R.layout.activity_main);
        BottomNavigationView navView = findViewById(R.id.nav_view);
        navView.setOnNavigationItemSelectedListener(mOnNavigationItemSelectedListener);

        menu1Fragment = new Menu1Fragment();
        menu2Fragment = new Menu2Fragment();
        menu3Fragment = new Menu3Fragment();

        getSupportFragmentManager().beginTransaction().replace(R.id.fragment_container,menu1Fragment).commit();
    }

}

fragment 생성 후 BottonNavigationView 이벤트에  FragmentManager로 출력될 fragment를 넣어주면 원하는 fragment가 출력된다.


추가 내용

Fragment layout.xml click 이벤트 이슈

아래와 같이 Fragment layout xml 파일에서 클릭이벤트를 지정하고 해당 메소드를 Fragment Class 파일에 작성하면


java.lang.IllegalStateException: Could not find method onClickButton(View) in a parent or ancestor Context for android:onClick attribute defined on view class androidx.appcompat.widget.AppCompatButton with id 'button'

메소드를 찾지 못하는 것을 볼수있다.

<FrameLayout xmlns:android="http://schemas.android.com/apk/res/android"
    xmlns:tools="http://schemas.android.com/tools"
    android:layout_width="match_parent"
    android:layout_height="match_parent"
    android:background="@color/colorAccent"
    tools:context=".Menu1Fragment">

    <Button
        android:id="@+id/button"
        android:layout_width="wrap_content"
        android:layout_height="wrap_content"
        android:onClick="onClickButton"
        android:text="Button" />

</FrameLayout>


Fragment를 생성하는 Activity 쪽에 매소드를 만들면 정상작동이 되지만 좋은방법이 아니므로 

Fragment 클래스에서 View 를 바로 리턴하지말고 View에서 버튼을 찾아 이벤트를 잡아주자.

public class Menu1Fragment extends Fragment {
    
    private View view ;
    private Button button;

    public Menu1Fragment() {
        // Required empty public constructor
    }

    @Override
    public View onCreateView(LayoutInflater inflater, ViewGroup container,
                             Bundle savedInstanceState) {
        // Inflate the layout for this fragment
        //return inflater.inflate(R.layout.fragment_menu1, container, false);
        view= inflater.inflate(R.layout.fragment_menu1,container,false);
        button= view.findViewById(R.id.button);
        button.setOnClickListener(new Button.OnClickListener(){
            @Override
            public void onClick(View view) {

            }
        });
        return view;
    }
    
}

참고 : https://ljs93kr.tistory.com/4

        https://wimir-dev.tistory.com/13


xml을 파싱을 하다보면 노드 사이에 공백을 텍스트 노드로 인식하여  #text 노드가 생성이되는데 

아래와 같이 처리를 해주자.

if (node.getNodeType() == Node.ELEMENT_NODE) {
   	//
}

if(node.getNodeType() == Node.TEXT_NODE){
	//
}


출처:https://stackoverflow.com/questions/4650878/how-to-remove-text-from-my-node-parsing-in-java-dom-xml-parsing

'부스러기 > Java' 카테고리의 다른 글

Static 키워드  (0) 2017.06.12
이클립스 Dex Loader] Unable to execute dex: GC overhead limit exceeded  (0) 2014.12.06
JAVA mysql 사용  (0) 2013.07.12


Sub Test()


Application.FileDialog(msoFileDialogOpen).AllowMultiSelect = True

'파일 오픈 다이얼로그에 여러파일을 허가한다.

'그 외 다른 다이얼로그 존재

'MsoFileDialogType Enumeration 

'msoFileDialogFilePicker 3 File picker dialog box.

'msoFileDialogFolderPicker 4 Folder picker dialog box.

'msoFileDialogOpen 1 Open dialog box.

'msoFileDialogSaveAs 2 Save As dialog box.


fileChoi = Application.FileDialog(msoFileDialogOpen).Show

'리턴값이 0 일경우 다이얼로그 취소.

'            -1 정상적으로 다이얼로그 사용시.


Dim fileNum As Integer

Dim dataLine As String


Dim strArr() As String


If fileChoi <> 0 Then             '파일을 선택하였을때


    maxLine = 0

    findFlag = False


    For i = 1 To Application.FileDialog(msoFileDialogOpen).SelectedItems.Count  '선택된 파일개수

      strPath = Application.FileDialog(msoFileDialogOpen).SelectedItems(i)          '파일경로


      fileNum = FreeFile()

        Open strPath For Input As #fileNum          


 j = 1


        While Not EOF(fileNum)


            Line Input #fileNum, dataLine


            strArr() = Split(dataLine, vbTab)


            If UBound(strArr) = 0 Then


            Else     

                'Cells(i + 1, 1) = strArr(0)

                itemName = strArr(0)   '이름

                itemNo = strArr(3)


                For k = 1 To maxLine


                    If Cells(k, 1) = itemName Then


                        Cells(k, i + 1) = itemNo  '기존목록에있으면 개수만추가


                        fineFlag = True

                        Exit For


                    End If


                Next k


                If fineFlag = False Then

                    maxLine = maxLine + 1

                    Cells(maxLine, 1) = itemName '없으면  추가

                   Cells(maxLine, i + 1) = itemNo


                End If


                'Cells(j, i) = strArr(0)


            End If


            fineFlag = False

            'MsgBox (LBound(strArr))

            'MsgBox (strArr(0))

            'MsgBox (dataLine)

            j = j + 1

       Wend                             '아이템 하나 탐색 종료


    Next i                             '파일 하나 탐색 종료


End If


'For i = 1 To filePath.Size


    'MsgBox (filePath(i - 1))

'Next i


End Sub


참고: https://msdn.microsoft.com/en-us/vba/excel-vba/articles/application-filedialog-property-excel

       http://software-solutions-online.com/excel-vba-open-file-dialog/

       https://www.exceltrick.com/formulas_macros/vba-split-function/

참고페이지 : http://lua-users.org/wiki/BuildingLuaInWindowsForNewbies

너무 길어서 실전압축 


우선 TDM-GCCLua source 를 다운받는다.

TDM-GCC은  tdm64-gcc-5.1.0-2 를 다운받았습니다.


GCC설치를 할때 환경변수 설정 항목이있는데 체크를 해줍시다.


lua 소스파일을 적당한 곳에 풀어줍니다.

그리고 윈도우 콘솔창으로 lua소스파일이 있는 곳으로 이동 후


mingw32-make PLAT=mingw


을 치시면 src폴더 안에 


lua.exe

lua53.dll

luac.exe   가 생깁니다.


파일 위치로 가서 실행을 시켜보면 잘 작동하는 것을 볼 수 있습니다.


이제 이것들을 적당한 곳에 옮겨서 환경변수에 추가하면 

간편하게 lua파일을 돌릴 수 있습니다.


실험에 사용 할 도메인은 Employee class


@SessionAttributes(value="employee") 


SessionAttributes alias은 employee 


출력시 어떤 스코프에 있는지 확인을 위해 RequestScope와 SessionScope 둘다 출력 하도록 하였다.


출력페이지 코드


결과 페이지 <br/>

RequestScope : ${requestScope.employee.name } <br/>

SessionScope : ${sessionScope.employee.name }


실험 1.

세션에 아무것도 없을 때


@Controller

@RequestMapping(value="test/*") 

@SessionAttributes(value="employee")

public class TestController {

@RequestMapping(value="test01")

public String test() {

return "forward:resultpage.jsp";

}

}


결과


실험 2.

세션에 데이터가 존재 할 때


@Controller

@RequestMapping(value="test/*") 

@SessionAttributes(value="employee")

public class TestController {

@RequestMapping(value="createEmployee")

public String createSession(HttpSession session) {

Employee emp=new Employee();

emp.setName("created Employee");

session.setAttribute("Employee", emp );

return "forward:resultpage.jsp";

}


@RequestMapping(value="test02")

public String test() {

return "forward:resultpage.jsp";

}

}


결과


전통적인 방법으로 세션에 데이터를 입력하였고 결과는 예상대로였다.


세션에 데이터가 있을 경우 실험1과 동일한 요청을 하였을때 

예상과 다르게 requestScope에도 데이터가 있는 것을 확인하였다.


그래서 결과 페이지를 직접 요청해 보았다.

RequestScope에는 존재하지 않는다.


@SessionAttributes를 이용 할 때에 RequestScope에 데이터가 입력된다.


실험3 


실험2와 동일한 조건에서 Model에 같은 이름으로 설정을 해보자.


@Controller

@RequestMapping(value="test/*") 

@SessionAttributes(value="employee")

public class TestController {

@RequestMapping(value="createEmployee")

public String createSession(HttpSession session) {

Employee emp=new Employee();

emp.setName("created Employee");

session.setAttribute("Employee", emp );

return "forward:resultpage.jsp";

}


@RequestMapping(value="test03")

public String test(Model model) {

Employee emp=new Employee();

emp.setName("new Employee");

model.addAttribute("employee",emp);

return "forward:resultpage.jsp";

}

}


결과


세션에 아무것도 없을 경우이다.


세션에 데이터가 입력되는 것을 확인 할 수 있었다.


세션에 데이터가 입력되는 것을 확인 할 수 있었다.


그렇다면 세션에 데이터가 있는 경우는 어떨까

참고로 createEmployee를 먼저 요청 후 test03을 요청하였을때 결과이다.


세션에 데이터가 있던 없던 별 차이가 없는 듯한 결과가 나왔다.


실험4


메소드 인자로 @ModelAttribute를 사용 할 경우.


@Controller

@RequestMapping(value="test/*") 

@SessionAttributes(value="employee")

public class TestController {

@RequestMapping(value="createEmployee")

public String createSession(HttpSession session) {

Employee emp=new Employee();

emp.setName("created Employee");

session.setAttribute("Employee", emp );

return "forward:resultpage.jsp";

}


@RequestMapping(value="test04") 

 public String  test (@ModelAttribute(value="employee")Employee employee) {


return "forward:resultpage.jsp";


 }

}


결과

세션에 데이터가 없을 경우

org.springframework.web.HttpSessionRequiredException: Expected session attribute 'employee'


익셉션이 발생한다.


세션에 데이터가 있을 경우


세션에 데이터가 있고 요청에 name을 추가했을 때

?name=test04


세션에 데이터가 없을 경우 익셉션이 발생 하는 것 말고는  

실험3과 같은 것 같다.


실험5


@ModelAtttibute를 메소드 위에 썻을 경우

실험1 부터 같은 조건을 해보았다.


@Controller

@RequestMapping(value="test/*") 

@SessionAttributes(value="employee")

public class TestController {

@ModelAttribute("employee")

public Employee employee() {

Employee emp=new Employee();

emp.setName("default create Employee");

return emp;

}


@RequestMapping(value="createEmployee")

public String createSession(HttpSession session) {

Employee emp=new Employee();

emp.setName("created Employee");

session.setAttribute("Employee", emp );

return "forward:resultpage.jsp";

}


@RequestMapping(value="test01")

public String test() {

return "forward:resultpage.jsp";

}

}


결과

세션에 데이터가 없을 때


@ModelAttribute 가 달린 메소드가 호출 되는 것 같다.


세션에 데이터가 있을 때를 위해 createEmployee를 요청 하였다.


세션을 만드는 메소드가 같은 컨트롤러에 있어서 그런지 위와 같은 결과가 나왔다.

그래서 컨트롤러를 따로 만들어 세션에 데이터 입력 후 다시해 보았다.


 세션에 데이터가 있을 경우는 앞선 실험들과 같은 결과가 나왔다.


실험6

앞선 실험들을 실험5의 @ModelAttribute가 달린 메소드를 추가해서 다시 해보았다.


결과

실험1 부터 3 까지는 같은 결과나왔다. 


※다만 실험4의 세선에 데이터가 없고 메소드인자로 @ModelAttributes가 사용 된 경우 익셉션이 발생하지 않았다. 


총 정리는 이해가 되면 그 때 추가예정.


추가 내용


org.springframework.web.bind.annotation

Annotation Type SessionAttributes


  • @Target(value=TYPE)
     @Retention(value=RUNTIME)
     @Inherited
     @Documented
    public @interface SessionAttributes
    Annotation that indicates the session attributes that a specific handler uses.

    This will typically list the names of model attributes which should be transparently stored in the session or some conversational storage, serving as form-backing beans. Declared at the type level, applying to the model attributes that the annotated handler class operates on.

    NOTE: Session attributes as indicated using this annotation correspond to a specific handler's model attributes, getting transparently stored in a conversational session. Those attributes will be removed once the handler indicates completion of its conversational session. Therefore, use this facility for such conversational attributes which are supposed to be stored in the session temporarily during the course of a specific handler's conversation.

    For permanent session attributes, e.g. a user authentication object, use the traditional session.setAttribute method instead. Alternatively, consider using the attribute management capabilities of the generic WebRequest interface.

    NOTE: When using controller interfaces (e.g. for AOP proxying), make sure to consistently put all your mapping annotations — such as @RequestMapping and @SessionAttributes — on the controller interfacerather than on the implementation class.

@SessionAttributes를 사용하였을때 requestescope에도 데이터가 남아있었는데 위에 저 부분이 해당사항인 것으로 추정 되어진다.

그리고 사용자 인증 같은 경우에는 맨날쓰던 session.setAttribute를 쓰라고 권고 하는 듯하다.

총평
애매하다 싶으면 다같이 그냥 쓰던거 쓰자.


잘 못 된 부분이나 더 자세한 정보를 가지고 계신분은 댓글 남겨주시면 감사하겠습니다.


.abcRioButton.abcRioButtonLightBlue { margin: 0 auto;}


+ Recent posts